Heavy, Unit Analysis

Landspeeder unit analysis

“If you shoot that thing right next to my ear again I’m gonna…”

The Tx-34 landspeeder unit is easily recognisable as Luke’s landspeeder from episode 4 A new hope . This is the same type of speeder, converted into a technical by the rebel alliance. Sadly this unit is what stopped me from playing the airspeeder. Unlike the airspeeder the landspeeder is a very cheap fragile platform that you can stick a bunch of guns and/or crew on. It’s definitely a glass cannon and fits the rebel aesthetic of taking what you can get in the fight against the empire.

Ever since the XP-38 came out, they just aren’t in demand.

Unit options and abilities

75p for 2 white dice, I’m in!

The landspeeder comes in very cheap at 75 points, but much like the at-rt the price is often around 110-120 since you will usually want a weapon hardpoint. 6hp and 4 wound resilience value just like the at-rt, but with surge-block and built in cover 1, however only armor value 2. Armor 2 helps vs corp troopers, but anything with larger and/or effective dice pool will get hits through. Arsenal 3 let’s you fire with up to 3 weapons at a time, which gives the speeder both a powerful combined attack and great splitfire opportunities. Transport open 1 is in my opinion a rarely useable ability. The imperial tank is transport open and I have seen that turn into a death trap for any unit being transported inside it. The speeder can hold a maximum of one non emplacement model so it’s use is a turn 1 speed boost for commanders and not much else IMO. Speeder 1 allows you to drive over terrain pieces with height of 1, giving you great mobility despite the speed value of 2. It also comes with the forced compulsory move and this is more of a boon than a drawback, as it allows the speeder to either move-move-attack or move-attack-move or any other nice combination. It essentially just gives the speeder 3 actions and for a heavy that is extremely valuable.

“Medium rare pls”

Upgrade choices are plenty with weapon hardpoints, pilot, comms and crew. In addition to the drivers dh-17 blaster you can take either the m-40 ion blaster or the mark 2 medium blaster. The medium blaster is just straight 4 black dice at range 1-3 in your front arc and can be compared to the rotary blaster of the at-rt. For 34 points 4 black with surge-hit gives you 2.5 average hits and will work fine vs infantry. You don’t get the massive firepower as the rotary blaster + surge-crit, but combined with the drivers blaster and a gunner crew it can become quite a effective attack, especially if you can flank troopers for a out of cover shot.

The M-45 ion blaster is a different beast entirely. It’s an exhaust weapon which usually is a big drawback, but on a speeder vehicle it’s not that big of a deal. It makes up for ut with range 1-4 and 4 white and 1 black combined with impact and ion 1 for only 4 more points. This is the only vehicle carried ion weapon and it is a nice anti-vehicle option especially against big targets like  he occupier or the at-st.

Do I even get a seatbelt?

In addition to the weapon hardpoints the speeder can have up to 2 gunner crews. The first and cheapest is the A-300 gunner for 9 points and it just adds 2 white dice, however it’s not fixed so you can fire 360° and at range 1-3. It’s not that great increase in firepower but, it combines fine with the medium blaster since they both got range 1-3. 

Look at that, that artwork is amasing

The second option is the RP-6 rocket launcher gunner for 36 points. A pretty heavy point investment that gives you 1 white, 1 black and 1 red dice with impact 2 with range 2-4. Giving you an increase of 1.875 hits thanks to the speeders surge-hit and it can be fired 360° from the vehicle. You also get the added bonus of a kickass looking twi’lek sitting att the back of your speeder with a friggin rocket launcher.

Upgrades

At the moment we got access to 3 different pilots one being generic and the other uniques. Wedge gives you 360° pivot instead of the normal 90°. This isn’t needed since you will rarely drive past your targets like the T-47 does. Ryder Azadi has like Wedge a 5 point cost and exhausts after use, he changes the speed of one of your moves during your activation, which includes a compulsory move. For the landspeeder this means that you can boost your comp move to 3 or break down to 1. The generic and more expensive pilot is the outer rim space jockey who gives the vehicle cover 1. This keyword stacks and it gives the landspeeder a constant heavy cover which combined with armor 2 can completely ignore the empires standard anti-vehicle rifle the dlt-19 (unless they roll natural crits). This let’s the speeder ignore small attacks, but be vary of large dice pools as it will overwhelm your defences. If they have for example 4 hits and 2 impact then you will still face 2 potential wounds due to the fact that the steps go goes cover-impact-armor.

Now 50% off

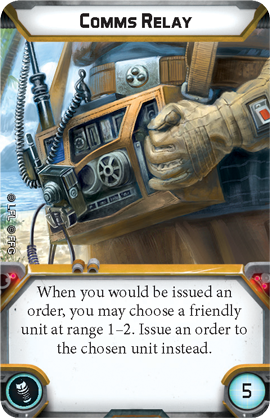
When it comes to comms there are several useful options. Long range comlink for 5p let’s you speed away outside of command range which suits a fast flanking unit like this, the same goes with hq uplink and it also gives some better command control with the added cost of exhaust. Comms relay is not recommended since you want to have a faceup order for your heavies as much as possible. Comms jammer is a good choice an very cheap now at 5 points. This unit is fast and can get close to enemies real fast. With the jammer, you can even park next to dangerous anti-vehicle units and feel safe. Sure they can still get the order from their stack, but with good placement and timing you can really destroy your opponents plans. 

Build and tactics

Love this model

The grabber jammer

  • Tx-34 landspeeder 75
  • Mark 2 medium blaster 34
  • A-300 gunner 9p
  • Outer rim space jockey 10p
  • Comms jammer/Long range comlink 5p

Total 134

This unit is the go to speeder if you want a heavy activation that works great as a flanker and can go efter critical targets. You could diet this down to 129 if you don’t feel like using the comms jammer or comlink. Combined att range 1-2 in your front arc you can throw out 4 white and 4 black for an average of 4 hits before aim. You could also do a nice split fire to several targets for maximum suppression distribution. On a critical turn you could activate late, drive straight into the enemy lines and hopefully displace a unit with your comp move. After that move straight into the heart of their forces and fire in all directions including the displaced target for a potential 4 suppression tokens distributed, then sit there jamming multiple units and hopefully ruining your opponents planned command card. If you go without the jamme, I suggest sending this to a flank and try to get behind trooper targets and deliver your 8 dice attack in their backs. Comlink helps with getting order to your speeder regardless of how far it drives from your commander. This could also be fixed with a trooper units carrying a comms relay.

The ion shark

  • x-34 landspeeder 75p
  • M-40 ion blaster 38p
  • RP-6 rocket gunner 36p
  • Ryder Azadi 5p
  • Hq uplink 10p

Total 164p

This is IMO the best build for the landspeeder and it’s the unit that will help carry the rebels in the post clone wars meta. Vehicles have always been a debated point in legion and the consensus is usually that going with more trooper units is better. However with the clone wars we will see more vehicles, clones have 2 announced already and the droids 1. That on top of the fact that droids will be affected by ion is great news for the rebel alliance who has the most and best ion options in the game. The tactic is to give this unit an order most turns thanks to hq uplink and the recover action, it swims steady as a shark until it pounces. Ryad lets you slow roll with a speed 1 comp move, followed by a recover action to get back hq uplink and Ryder for the next round. Your main targets is of course the enemy vehicles, with the at-st and occupier being the primary ones. If your opponent activates their vehicle you can follow with the speeder going a speed 3 comp move then unleash your combined range 4 attack of 1 red, 2 black and 5 white with impact 3 and ion 1. This is a nasty anti-tank shot. You can then follow up with a recover action so you get back all 3 of your exhaust cards. Next round go with a 1 pip command card and try to first activate the speeder thanks to hq uplink and give the enemy vehicle another attack, aiming if needed otherwise go recover again. This is a huge suckerpunch that Will leave your target with several wounds and 2 ion tokens completely shutting down their next activation. Your opponent can counter this with repair units like astromechs, but if they are removing ion then they don’t repair dmg. If you are facing no vehicle lists then it’s still an okey dmg dealer that can move across the table and attacking at long range with an average of 4 hits providing you can recover the ion blaster for each shot. With the latest point errata, vehicles will be cheaper and probably show up a bit more often. Combine this with the reduced rebel trooper ion squad to shut down enemy vehicles.

X-34 as a transport

This time on craaaazy taxi!

I think that open transport is just not a good Rule for transporting. You get a small speed increase for your commanders/operatives, but you risk giving your opponent bonus wounds and you can’t attack out of it. If i had to use a transport, I can see the use for getting Solo or Leia in a good position since they have short range weapons, but I would disembark quick. I have thought about using a crazy taxi Luke when his new operative form comes out.

Crazy taxi

  • X-34 landspeeder 75p
  • A-300 rifle gunner 9p
  • Comms jammer 5p

Total 89p

My plans is that you save your speeder with Luke onboard for your last activation round 1. You burn 3 moves straight into the heart of the enemy and Luke jumps out. Next turn use “son of Skywalker” or “I am a jedi” and let Luke go bananas. The speeder can run around trying to displace units and harass with the white dice it has and thanks to comms jammer try to block any big command card threat to Luke. I don’t know if it will work, but hey it might be fun. 

Yeah, I bought this baby from som farmboy punk, didn’t even have to give much for it

This is my analysis of the rebel X-34 landspeeder. A unit that I think works fine and has a lot of potential in the future. Give that ion shark a go and tell me how it went. If you like my analysis then pls consider supporting me on patreon https://www.patreon.com/Rebelsguide and comment on this blog with suggestion for future articles.

Battle report

Battle report Double officers vs Vader&Bossk

Welcome to another battle report. This time I faced 2 opponets who used one of my opponents lists, they played togheter with one command hand and it was more like a player with a coach. I think it both worked to their advantage with different ideas, however sometimes I think it might have worked against them with the classic too many cooks.

We played at our local gaming place at Studiefrämjandet.

It was great to finally test some of my newest terrain pieces. This match we had alot of light cover area terrain and some line of sight blocking trees + the building. As well as some difficult terrain water terrain and barricades. I used my modified list from the last time, learning from my misstakes and took some hints from my last opponent.

Rebel Alliance 798
Commander
Rebel officer – esteemed leader 55p
Corp
Rebel troopers – z-6 trooper, astromech 70p
Rebel troopers – z-6 trooper 62p
Rebel veterans – cm-0/93 trooper, rebel veteran, hunter 97p
Mark II medium blaster trooper 38p
Special forces
Rebel commandos strike team – dh-447 sniper 44p.
Support
At-rt – flamethrower 80p
At-rt – flamethrower 80p 
At-rt – rotary blaster 85p

I faced an imperial list led by Darth Vader with a Bossk operative. Supported by e-web teams and stormtroopers.

Empire 798
Commander
Darth Vader – force reflexes, saber throw
Operative
Bossk – Hunter, targeting scopes
Corps
Stormtroopers squad – dlt19 trooper
Special forces
Scout troopers strike team – dlt sniper
Support
E-web team – barrage generator

After a die roll my opponets chose to be blue player and we ended up with clear conditions, advanced positions and breaktrough. I had some luck with breakthrough coming up at the third spot so I could guarantee it, which favoured me with 12 activations against 9.

Run to the hills!

I deployed most of my units in the centre left, using the scout move from advanced position to get some squads further ahead. I put my rotary at-rt alone in the other end of my deployment with a trooper squad and officer in the centre. I thought a reserve of 3 units with inspire support was a good idea for the breaktrough objective. The rotary at-rt was gonna walk straight into the imperial deployment zone from the flank, firing as it goes.

The empire focused most of their units around the crashed at-st and barricade line where they had a great line of fire to a large area and put 2 trooper squads on the left flank.

Round 1
Command cards
Assault vs Lying in wait

These command cards is pretty fitting for how the game went

I wanted to save my flamer at-rt’s to last so they don’t take too much damage, I also gave order to my veterans to get the free dodge as well order token to my emplacement trooper. The empire had no choice, but to give order to Bossk who sat and got all the aim tokens.

The empire started with a nice 2 wound sniper shot at my backline officer. I followed with a great z-6 squad opening, dealing 3 wounds on the closest e-web.

This squad kept over performing and managed to duck so much fire that came their way, surviving with a dodge token gifted by my rebel officer. We traded a few long range shots, not doing much damage and the at-rt’s started to advance.

Fire chickens, charge!

It was my first time playing against Bossk and oh man, can he store aim tokens. He waited for good shot at my at-rt which the stormtroopers tried to soften up with a dlt. Luckely I managed to repair it with one of my astromechs.

Steady…steady…steady…

Bossk finally had to activate and he crawl forward and decided to take his shot at my closest flamer at-rt. It was amazing to whatch, it was just re-roll after re-roll until he had his 5 crits. Putting 5 wounds on the at-rt it got damaged, but I repaired it putting it at 4 wounds at the end of the round. Bossk with targeting scopes was scary, if he re-rolls that much he would completly bypass any dodge and guardian.

Cold blooded patience.

End of round
If felt happy with the first round. The empire didn’t make much progress across the board while my forces moved quite a bit for a single turn. While the sniper shot that took out half my officer in the back was disheartning, my z-6 squad was mvp this round. Dealing 3 damage and despite being shot by 3 attacks lost nothing. My opponent focused alot one of my flamer at-rt which worked in my favor thanks to the astromech healing. The plan was for Bossk to burst it down which would have changed alot.

resourceful, reliable, reparing astromechs ❤
Rebel advance!

Round 2
Command cards
Covering fire vs Reptilian rampage

Dodge tokens vs a crit slinging lizard.

This round I wanted to keep reparing my walkers as well as use the covering fire to advance in the open area between my position and the forest. I gave order to my 2 astromech squads as well veteran + emplacement again. Empire of course gave order to the rampaging Lizard. The empire first activated a random and got a corp order which they used to put their far left stormtrooper squad outside of at-rt walk-fire range and put 2 wounds on it with their dlt supported attack. I activated one of my astromech squads to repair my at-rt up to 3hp and attacked the e-web dealing no damage, but giving out a dodge token to another squad due to covering fire.

It is akward when just one base is lacking grass 😛

Here is when my opponets were really unlucky with Bossk. They had a plan to double tap my at-rt with 3 hp left, providing they got a crit on the first attack they could pierce it trough my save and then use their aim token on the second attack to hopefully get 2 crit on the second attack and drop the at-rt. However they roll 5 blanks on their first attack so they decided to attack my trooper squad with the second to push on the supression. 3 hits after aim sadly got denied by cover and my dodge token.

acrylic tokens helps your troopers survive

In this game I really got value from my astromechs, I activated my second astromech squad and repaired the last hp I could giving my at-rt effectivly 10hp instead of 6. Then they rolled amazing and killed the 1hp e-web.

Then it was time for Vader to show his troopers how it’s done, he walked into position behind the barricades and drop 2 soldiers with his saber throw.

If you will not fight, then you will meet your destiny!
My acrylic tokens went out, coincidence?

My at-rt went into position for a next turn stormtrooper barbecue. My other one lost his first action and just walked up against vader. next I finally got to use fire support with my veterans. Despite throwing 9 black dice with aim I only managed to put 1 wound on vader and got one wound deflected due to his forces reflexes.

End of round
My flanking trooper squad and rotary at-rt kept advancing and dropped a strormtrooper or 2. Thing were locking okey for me, but I was scared of having vader so close to my lines. I had the advantage, but if I can’t stop Vader then this will be a short breakthrough.

Oh right, my strike team also walked up behind the walker

Round 3
Command cards
Ambush vs Master of evil

“Okey guys, one 3 we jump out and fire at the 2 meter tall cyborg death man who can block blaster bolts with his hands. Uh sir that seem…3!”

I expected master of evil, but I thought that they might play implacable as well so I played it safe with ambush. I issued order to my veterans and emplacement trooper while Vader got his order and a dodge tokens as well as an e-web and Bossk. My first Fire support activation again only pushed trough 1 dmg on Vader, fire with hunter veterans feels powerful, but the force was with the dark lord of the sith this day.

“If that dosen’t kill him what will?, Not us…run!”

Vader activated and gave me a total of 12 supression tokens! He then crushed my flamer at-rt with saber throw. I followed that with a randow draw support, Flame on. After aim-shoot I got a very average 7 hits on the 5 troopers and their armor was useless.

I prefer my stormtroopers red in the middle

The rest of the fight on the left flank wasn’t very dramatic. Most of my troopers had 3+ supression and I needed to start moving if I wanted to reach the enemy deployment zone so I ignored the dodgeless Vader. My backline officer had walked into range enough to use his inspire which combined with my other officer and at least 1 succesfull rally each time prevented my units from panicking despite e-web and Bossk supressive attacks. My flamer at-rt got another 2 wounds and was also damaged.

End of round
My flank units continued towards the enemy line and finished of the rightmost stormtrooper squad. After removing supression tokens during the end of the round I felt pretty safe. I understand how this imperial list could be panic central when combinding supressive weapons with master of evil. I had some luck with activation order to use inspire as well as at least rally 1 token each rally step,

Sneaky rebels

Round 4
Command Cards
Push vs Implacable

Vader and Bossk has so cool cards.

I gave order to my veterans + emplacement once again as well as my officer. Imperial gave it to Vader.

Vader started by walking to my right flank and cut down 2 troopers with his saber throw and took one damage to put back his order token via implacable. My trooper squad responded by fire back, as standard for my gammorean z-6 trooper he rolled 3 crits + 1 hit :). However vader was really implacable and blocked every bolt with his saber.

Meanwhile on the left flank the shooting gallery continued. The rebel forces ran trough the woods towards the edge of the battlefield, while the veterans setup in a covering position in the forest. Thanks to the heavy cover and diminishing imperial troopers casualties was minimized. However my 2nd flamer finally went down.

Run, they cannot shoot us all!

End of round
On the right flank my rotary at-rt blasted the imperial strike team and Vader finished of the foolish troopers that shot at him and walked towards the rebel officer. My sniper team managed to put 1 wound on Vader. I felt like I had a pretty good chance of placing 2 units in the enemy deployment zone. The empires chance is to stop me from putting more than 1 unit and pick up the bounty on my Twi’lek officer forcing the game to points which the empire would probably win thanks to the huge amount of points stuck in Vader&Bossk.

Round 5
Command cards
Turning the tide vs Merciless Munitions

“He has a what grenade?”

The empire could only give order to Bossk and I had only my rotary at-rt left. I was a bit disconserned when I saw the Bossk grenade card, I had totally forgot he had grenades. Luckily for me Bossk was just a bit to far away to hit several units with the grenade, If he was about half a speed 1 move closer he could have gassed 3 units.

You gonna have to work on your throwing arm mr Bossk!

My emplacement trooper stayed behind to cover my advancing troops and dropped 2 troopers, sadly the e-web survived my rotary at-rt and could keep the barrage generator on while pounding my troopers, that combined with bossk grenade attack I had only 3 trooper leaders + 1 astromech left of my troopers.

End of round
Vader did a sweet curved saber throw cutting the at-rt in half down to 3 wounds and my right flank was starting to look battered. Going in to the last round I felt that my offices was already dead due to vader being so close and the at-rt could be taken down by the last stormtroopers + e-web. However I felt that my strike team was garantueed to make it into the deplyoment zone and live through the round. On the left flank I had to put at least 1 unit in the enemy line, if Bossk managed to drop my officer it would be clutch due to the fact that my troopers could not stay supressed since they all needed 2 moves to make it across.

Round 6
Command cards
Sabotaged communications vs New ways to motivate them

This will be tense

I gave my order token to the only available special forces while my opponent gave it to Vader an Bossk. My first activation was a random drawn commander, I activated my twi’lek inspired a trooper squad and ran into the goal zone.

Touchdown!

Here I have to tip my hat to my opponent, he did a very cool manouver with Bossk thanks to the extra action from Vaders card, he was very close to turn the game. Bossk used his unhindered to jump over the x-wing wreck and fired with an aim token from hunter on my rebel officer who now lacked any unit in range to use guardian. My officer just managed to duck enough wounds to surive and deny Bossk his bounty. Bossk then ran into melee with my veterans stopping them from walking as well and regenerated the wound lost for the extra action. Wow it was a great activation, if it had worked he would have denied me 2 victory tokens while gaining 1.

“I can feel your anger”

His lone stormtrooper put a supression on my closest leader preventing him from double move, the e-web survived my rotary blast with 1 wound and then killed my second closest leader. My veterans used their hunter to club Bossk down to 2 hp.

Tense game, but here rebel victory semed imminent.

Vader walked up and cut of my officers head with his saber throw, while my sniper team walked into the victory zone and popped another wound on Vader.

I feel bad for my sniper team in the fictional turn 7 :p

End of round
Now if Bossk had taking his bounty the score would have been 2-1 and his last stormtrooper squad could aim-shoot my at-rt and hope to drop it, in that case my last supressed trooper leader had a 1/3 of winning the game for me. However Bossk just missed it and the stormtrooper couldn’t get 3 crits. My supressed leader didn’t rally so in the end the rebels won 3-0, the final score dosen’t really paint a fair picture of the full match and it could have turned the other way easily.

Rebel breaktrough

After battle report
It was fun to play with all my new terrain pieces and I think that this list worked a little better than the last version. While I didn’t get to be blue player I got a very lucky mission to play with 3 more allbeit weaker activations. I felt that the veterans with hunter + emplacement fire support worked well in theory, but they did a total of 2 wounds despite rolling a total of 18 black dice with aim in their 2 attacks. I think fire support have great potential and I think my choice to hold them back worked in their favor to not get focused early and the hunter gave me a total of 3 aims during the game and it could have been 4 if I didn’t have to run towards the deployment zone.

RNG
I felt that the dice was in my favour in the start of the match. My z-6 squads delivered 4+ hits almost every attack while the average is 3.5. The early 3 wounds on the e-web did alot since the double barrage generator combined with master of evil is an great combo against rebels. My opponent focused my at-t’s which I think was smart looking at the huge damage just one of them did, however due to below average rolls I was given plenty of time to repair. I think that the biggest rng swing was with Bossk. My opponent gave him targeting scopes and he gained a ton of aims during the game either from hunter or actions, despite that he rolled pretty poorly espechially in important attacks like the 2 wound at-rt and the bounty officer.

List building
I was suprised when I saw targeting scopes on Bossk as this card have recieved it fair share of negativity, but dang he used it alot during this match. For my own list I felt that swapping 2 rotary to flamers made them more of a threat and they tanked alot of damage this game, while I could use my astromechs to their fullest and reparing 4 wounds. The double officer still works with giving me a great command range as well as precise inspire and extra activations. However despite guardian, they are very squishy and the risk is giving away bounty. I think double officer works, but maybe Leia is so pass powerful that her with commanding presence and esteemed leader might work better or just as well. 2 officers is essentially splitting Leia in 2 while loosing her command cards. This was also my first game with veterans and I like them, they feel more like a special forces unit than corps unit and the fire support with the medium blaster was scary even when it failed against the Vader tank this game. The drawback is that you often feel forced to give them an order due to the coordination order to enable fire supprort and get the free dodge token.

Battleplan and tactics
The plan was pretty simple, place a massive blob to run behind the fire chickens that tanked enemy fire. Hopefully get enough units to the enemy line. The backline deployed force worked very well even though they spend 2 turns just walking, having fresh troops arriving at the enemy flank was great and it forced my opponent to decide where to focus his troops. The fire chicken tanks work great with my astromech squads. However I must pay more attention where my command range ends, I had a opportunity to play turning the tide vs master of evil, but one of my at-rt was just out of range.

Happy to write another battle report and I find that going through the match a day after, looking at pictures you get to reflect on the match. Somethings looked more even than it felt and you see what misstakes you avoided or did during the match as well as to get a clear picture of how different units delivered. If you like my stuff pls consider supporting me on patreon: https://www.patreon.com/Rebelsguide

Next time I think I will try some tauntauns or perhaps Sabine, see you then.

Battle report

Battle report Rebels double officer vs Empire Veers

This is my first battle report on this blog and sadly I can’t present you with a heroic rebel victory, but an imperial victory with rebels fleeing home to lick their wounds and learn from their mistake.

I haven’t played legion since earlier this summer due to work and the 2 places I do most of my playing is closed during the summer. It was fun to finally get a game in and it was against one of my old oppoents who I have the bad habit losing against.

I decided to give my double officer vehicle list a try.
797 points Rebel Alliance

Commander
Rebel officer – esteemed leader 55p
Corp
Rebel troopers – z-6 trooper, astromech 70p
Rebel troopers – z-6 trooper, comms specialist, comms relay 76p
Rebel troopers – z-6 trooper 62p
Support
At-rt – rotary blaster 85p
Heavy
X-34 Landspeeder – Ryad azadi, m-40 ion blaster, rps-6 rocket gunner 154p

I faced a Veers led imperial force

800p Empire

Commander
General Veers
Corps
Stormtrooper squad – dlt19 trooper
Special forces
Death troopers – dlt-19d trooper, weapon config
Royal gurad – electrostaff guard, recon intel
Heavy
Occupier tank – dlt19 rifle pint, first sergeant arbmad

Yes the Leia sleeves are new 🙂

We played at my friends house so we used his terrain, including some plant pots. I at least contributed with my newly painted barricades. I choose to be blue player and we ended up with Clear conditions, intercept the transmition and battle lines. I deployed my 3 at-rts in a line spread out and focused 2 groups of corps and officers on either flank while my speeder ended upp far right facing his occupier. He focused heavy on the right flank leaving only 2 stormtroopers on the left.

My initial plan was to save my speeder for my last activation and try to focus on the left and centre transmitions while still threaten the right on forcing him to focus his attention there.

Round 1
Command cards
Assault vs Maximum firepower

I gave out order to my 2 at-rt’s to the right and to my landspeeder, while my opponent gave it to Veers. His first activation was a random drawn special forces and he choosed a death trooper squad who walk forward and took a long shot at my astromech squad deployed right and did a full barrage of 7 hits and after cover I rolled 5 blanks, losing everyone except my duros leader pictured in the left bottom courner. So right of the bat, I had an uphill battle. The occupier and some dlt’s just managed to drop my right at-rt, really wished I hadn’t lost my astromech :(. My landspeeder did a nice 3 dmg at long range on the occupier and ionised it so I was still hopeful.

Ion shark delivers 3 dmg and an ion token to the tank, nice vengence for the first attack.

On the left flank things looked better, his troopers advanced on the objective, but I managed to drop 2 of them and taking no wounds in return.

Offier leading by example

End of round I had lost 5 troopers in my right astromech squad and 1 at-rt. His maximum firepower did only managed to put 1 wound on my speeder. Sadly my counterfire only managed to drop a single death trooper, but at least his tank took a beating of 3 dmg and had 1 ion token. My brave second officer bravely fled the right flank and went towards the centre.

Oh brave sir Twi’lek so bravely ran away…

Round 2
Command cards
Covering fire vs Imperial dicipline

My plan was at first to ambush my speeder since I didn’t think my opponent was going to burn his second 1 pip card on turn 2. After the dmg I took last turn I felt that I needed some defence in order to save my remaining troops and try to contest some objectives. Thanks to comms jammer I could give order to my speeder and I got first activation after the die roll.

Dang that artwork is cool

Expecting to go second I saw and took an opportunity to spread some dodge tokens and activated my lone squad leader before he got taken out, going dodge then attack to give out a dodge token. My opponent didn’t have range to order his tank and gave orders to his death troopers to rearm/swap his weapon configs. Since he had 5 orders in his stack I felt it unlikely for him to activate his tank before my speeder.

You get a dodge token and you get a dodge token!

Sadly he took a gamble and drew the top token in his stack and of course it’s heavy. This stopped my double tap ion to shut down his entire activation, but at least I stopped his move+ aim action and again my speeder only took 1 dmg from the tanks attack.

Meanwhile in the centre I moved up my officer towards the middle objective followed by my mobile cover at-rt and astromech squad. Sadly his grenade config bypassed my cover and delivered 3 wounds on my officer despite guardian. My astromech squad moved into objective range and avenged my officer by dropping 2 death troopers and give my officer a dodge token thanks to my command card.

Look out sir!

His second stormtrooper squad went into the forest to contest the cenre objective and a long range death trooper squad managed just to get trough 1 wound on my offices after cover, dodge and guardian. Very close, but not enough :(. On the left my at-rt and officer attacked his stormtrooper squad who sat behind cover with a dodge token. My leftmost trooper squad tried to finish the squad off and then moved into the middle. Here is one of my big mistakes, I should have taken the safe route and stayed with my trooper squad left to secure that transmition instead of going centre. My eye mesurement was off and I just missed reaching the centre objective with my leader and I got greedy instead of taking safe objective points. Meanwhile his last 2 royal guards who had gotten some stray fire and a rotary blast managed to rally and double moved to charge my astromech squad behind the at-rt.

Hey, guys where are you going? The terminal is this way!

End of turn my right troopers had survived some shooting thanks to their dodge tokens. The speeder slow moved speed 1 with ryad and gave the tank another salvo while split firing the drivers 2 white dice towards the stormtrooper squad near the objective. Here my hope vanished, my ion blaster/rocket attack rolled 1 red, 2 black and 5 white delivering only 2 hits which he blocked :O. No damage and no ion and just to add salt to the wound, my driver rolled 2 blanks with his pistol. Well nothing more to do than recover the blaster and ryad and try again next turn.

Sir, that rocket just bounced of the tank…

Due to my greed and my opponents good movement the empire took the lead with 1-0 starting round 3.

At least I get to use my nice metal tokens.

Round 3
Command cards
Sabotaged communications vs Assault

I suspected my opponent to put down a 2 or 3 pip cards and I wanted to go first while negating his card which I did. Bonus points if you remember that I have neither an operative nor special forces in my army, it’s the price of going full genereic. Still I was after the first activation more than anything and I couldn’t reach my speeder with my remaning officer so sabotaged communications it is.

We’re fine here, how are you?

I started to feel the force was against me. My first activation was corps and I went aim-shoot with my comms squad trying to finish off the death troopers out in the open. However despite an aim token I only managed to get 3 hits which they all saved. (Did I mention I dislike death troopers?).

I keep shooting, but they keep coming!

Veers gave out some aim tokens and did a potshot that didn’t do anything. I got my speeder and decided it was time to turn the tide so I went a comp move of 3 with ryad and moved into flank position. I fired my rocket into the occupiers weak side delivering 3 crits that only resulted in one dmg and the ion blaster + driver pistol managed 4 hits on the stormtroopers, yet only 1 trooper died. I think the speeder worked fine and did everything acoording to plan, but after round 1 his red dice where way to hot for me to do any real dmg. I felt that at least my build and plan worked fine, despite the poor result.

Drive by!

He did some long range shooting on my at-rt since I had my troopers locked into melee with his royal guard, a fight which they managed to win and the astromech could treat the at-rt.

It’s weird how often my rebel troopers beat roal guards in close combat.

The lack of ion gave the tank a full turn of action so move – free aim into attack on my speeder. 2 natural crits and 2 via impact followed by 4 blanks = Kaboom!

Imperial migth!

End of round, his left stormtrooper squad leader had panicked and my at-rt fired 5 hits into his death troopers who swatted it like flies after they had mowed down 4 troopers leaving me with 2 squad leaders and 1 astromech.

Did I mention I dislike death troopers?

A last ditch effort to stop him from holding the right objective. Aim – shoot and only 2 hits that is negated by cover.

Only rebel troopers are so precise

Round 4
Command cards
Ambush vs Push

I stared defeat in the eye, but I felt that maybe I can get a victory point at least. Ambush beat his push and I decided to give order to my officer and then only have support and corps in the stack.

Okey guys here is the plan, I run and you die.

I draw a random order and got corp and tried to take down Veers who stood in the open with 1 wound. Sadly I rolled only 2 hits and caused 1 wound. His deathtroopers started to put down my lone squad leaders and my last effeort to get a point kind of sums up the match for me. My officer rolls blank into blanks after aim.

Sry about the mess…

So at the end of round 4 I conceded, I had no chance to win unless I could hold 2 points during round 6 while my opponent held 0.

End of battle thoughts
I had a good time finally playing legion again as well as playing with my friends 14 month old puppy. It’s easy to blame the dice after this match, but it was just one of the factors. I find that my plan to use my speeder against the tank was fine, yet I didn’t get the result I wanted. The dice did not work for me in that regard. I think there was 3 factors that contributed to the loss.

Rng
My attack dice failed me several times despite aim tokens and my opponets defence dice blocked much higher than average. The first attack that butchered my astromech squad was a hard blow and the 1/5 chance to pull the heavy order token my opponent did was also lucky.

List buildning
I think I had to many vehicles and while the speeder worked, I think it couldn’t get the support it needed. I find that I had to few troopers to support my vehicles and contest objectives. Having no operative nor special forces when using only generic command cards feels like a missed opportunity. The rotary blasters didn’t work that well, even with aim I got pretty average rolls. I think with 3 walkers I could use flamers as more of a threat.

Battleplan and tactics
I did a greedy move during round 2 that cost me a victory point and I think I spread out my forces to much and I should probably avoid battle lines in my list since I didn’t have much long range firepower. Also my opponent played really well and focused his units in the right positions .

So I had fun time, but faced a hard loss. I made a few misstakes and will use this to learn and adapt. My modified list uses dissaray instead of battle lines in my deployment cards and removing the landspeeder for more troopers. This list gives up the anti-tank landspeeder and goes more offensive with 2 flame walkers. 1 rotary and mark 2 medium blaster trooper can work as fire support. The rebel veterans can hunt enemy characters and royal guards while the sniper team gives me a special forces unit as well as some flexible long range dmg.

Rebel Alliance 798
Commander
Rebel officer – esteemed leader 55p
Corp
Rebel troopers – z-6 trooper, astromech 70p
Rebel troopers – z-6 trooper 62p
Rebel veterans – cm-0/93 trooper, rebel veteran, hunter 97p
Mark II medium blaster trooper 38p
Special forces
Rebel commandos strike team – dh-447 sniper 44p.
Support
At-rt – flamethrower 80p
At-rt – rotary blaster 85p

That was my first battle report and sadly it was not a victory, but a very informative defeat. I apologize for the picture quality, I wasn’t planning on recording the match for a report. in the future I plan to use a better camera and take some more detailed pictures. If you enjoyed this battle report pls tell me in the comments and if you like my stuff pls consider supporting me on patreon: https://www.patreon.com/Rebelsguide

Support, Unit Analysis

At-Rt Unit analysis

“Hey, why didn’t I get to be in Rouge one?”

Unit introduction

“Is that a…”

The At-Rt (all terrain recon transport) is a clone wars era scout vehicle and works as a mobile fire support unit for the rebel alliance. At first I was lukewarm to the At-Rt being in the core box. I thought: “they couldn’t put out a core box before going to clone wars era, ugh”. However it grew on me and thanks to the alliance refit of the arc-170 in x-wing and the rebels episode where they find an abandoned clone wars base a story started in my head. A rebel force attack an imperial base that they heard have low security. When entering the facility, they find out why the security was so lacking. It’s a surplus storage facility, where they find old blaster, non functioning equipment and a large number of At-Et’s. Despite having weak armor and weapons the rebels make the best of it and since they lack spare parts and plans for maintenance. I wanted my forest world recon walkers to look muddy and rusty with the old paint job from their episode 3 appearance. Decommissioned from the empires service in favor of more advanced modern vehiclems the rebels use what they get and it’s really fitting the David vs Goliath relationship of the rebels vs empire with an at-rt going up against the at-st.

Before the dark times…wait that is pretty dark

The rebel at-rt is in my opinion the most balanced unit in the game. I’m not saying it’s the best unit in the just the most balanced in both internal balance (compared with other rebel units and options) and external balance (compared to other faction units and options). It has 3 weapon options and they are all viable picks despite being very different. I often find myself annoyed at some design decisions where I just don’t understand the reasoning, but with the at-rt almost everything went right. You might think that I claim the Rt is perfect and it’s not, but close. I have 2 gripes, one being that it should have been armor 2 and surge-block. However since armor was an all or nothing keyword when it was desighned I will let it slide. The second thing is that the climbing vehicle is rarely useable and I would have preferred it just being unhindered by difficult terrain instead. You might of course find yourself on a table with a bunch of things to clamber on, where you can get cover or good line of sight. However this is not often the case in my experience.

Unit options and abilities

55 points, what a bargain

The At-Rt comes in at a base cost of 55p which sounds cheap, but you often want to take one of the 3 weapon options pushing the cost to 80-90p. It has a nice speed of 2 with a medium sized base that gives it quite a good mobility. 6hp and 4 resilience threshold is fine for the price and the armor keyword makes it pretty resilient to non impact weapons, however with a surgeless white dice defense, most crits will go through so don’t expect more than one block each game. Except for the 3 weapon options, the only upgrade it can take is comms. Surge-crit helps in its anti armor role and its melee weapon is not to be overlooked, 3 red dice with impact is not bad. Like mentioned before it has the armor keyword, so all normal hits than aren’t flipped via impact are canceled. It has clamber vehicle and expert climber so it can move just like a trooper with grappling hooks. Thanks to its base size it moves about an extra 1.5 small base lenght compared to a normal trooper. 

“Burn heret…imperialist!”

The at-rt got 3 weapon options. The first and cheapest is the Flamethrower which comes in at 25 points. It has only range 1 and instead of a fixed dice value it gives 2 black dice per miniature in the defending unit that is in line of sight. This combined with the blast keyword makes this a nightmarish weapon vs trooper squads, especially other rebel troopers or the soon to come cis. The more models the more dice and blast takes away cover so the effectiveness is increased vs lighter armor. 2 black dice per miniature with an average of 0.625 hits per die gives you pretty good odds of getting at least as many hits as defending models in every attack.

“6 barrels, 5 dice. You do the math”

The second and slightly more expensive is the Rotary blaster at 30 points. This is the true utility weapon of the unit if not the entire rebel faction. 5 black dice at range 1-3 with surge-crit and no keywords it is the jack of all trades. With its range, dice pool and surge-crit it can hurt both vehicles and troopers alike, but not as effective as the other 2 weapons to their specific targets. It’s the go-to weapon if you don’t need specific anti-tank or anti-infantry firepower in your list.

“I think we found your smoking gun”

The third weapon is the Laser cannon which has the longest range 2-4 and highest price at 35. This gun was the sniper before the sniper teams came out. It has 2 black and 1 red with impact 3 making sure that any hits that go through cover turns into crits. Due to the range you can often just sit and go aim-shoot with a 2-3 hits every time. This gun isn’t that effective vs troopers since heavy cover nullifies most of your dice if you don’t roll crit or surge, but vs imperial vehicles you can often count on 2-3 crits every attack since they don’t have easy access to cover.

Build and tactics

The fire chicken

  • At-rt 55p
  • Flamer 25p

Total 80p

“Weapon destroyed?, taste my A-300”

This is the cheapest one you can get with a weapon hardpoint. You might considering putting a hq uplink on this one to combine with “sorry about the mess” or a unique 1 pip cards as this unit screams last-first activation. The range 1 is limiting, but if you spend a turn double moving and then first activate for a move shoot next turn, you can cover a lot of distance and get the drop on an unlucky trooper unit. I suggest taking 2-3 of this unit since it’s gonna be a priority target for your opponent and it has to survive on the way to it’s targets to get any firepower from it, so having a pack makes it much harder to deal with than a single one. Han solo is a great commander for these ones, since his reckless diversion can help them walk up the battlefield without getting shot at. The “sorry about the mess” hq uplink or improvised orders can give you a nice last first activation to guarantee a burned enemy unit. I think of these ones as flaming missiles rather than fire support. You should pick on target to go after and hope you can get there before being shot down, any turns after that is just a bonus. If you are faced with a single model unit, remember you have a nice 3 red melee weapon.

The Z-6 big brother

  • At-rt 55p
  • Rotary blaster 30p

Total 85p

Rotating rotary

This is the basic At-Rt fire support. It works very well with your rebel troopers, commandos and any trooper unit with a range 3-4 weapon. It’s gun does an average of 3 hits, which is just shy of what a Z-6 trooper squad does, however it doesn’t lose any attack dice when suffering wounds unless you get weapon destroyed after you reach your resilience value. It also doesn’t care about suppression like troopers, so you can often do an aim-shoot to increase your dmg output. This is the At-Rt’s main strength, it’s a workhorse that delivers until its destroyed. I want my enemy to shoot att my rts because then my troopers can do their job and don’t lose effectiveness . Even with 5 wounds and chance of only having 1 action per turn from the damaged vehicle, the rotary blaster still spits out average of 3 hits per shot. Using a group of commandos with the rotary At-Rt is like giving them a mobile heavy cover that also have a gatling gun. 

Sniper RT

  • At-rt 55p
  • Laser cannon 35p

Total 90p

“We have spotted imperial walkers”

This is a stable anti-tank platform, but it has limitations when attacking infantry. The range however let’s it stay out of range of some impact firepower and stray blaster bolts and it doesn’t have to move all that much. A speed 2 move with the medium base + range 4 is a long distance on the battlefield, so this unit can work as a sniper when single models units present themselves out of cover. While the range 2 can feel limiting, you can just run into melee if someone gets that close. This is a unit that I could take 1 of, but it works fine as a pair. 2 of these can really put some consistent hurt on any ground vehicles you face when they aim-shoot together, speeders are harder targets these days with their often cover 2 protection that blocks your impact. Ironically their favourite targets are other At-Rts which they will make short work of.

Tips and tricks
Since they have so few upgrade slots I figured I would do a general tips and tricks section instead.

Reversing
I find that a lot of players, myself included forgets that ground vehicles can reverse. This has the obvious advantage of getting out of range from enemy weapons or melee units like Vader. However it can also help with getting units in your fire arc, even better than pivot does.

Mobile cover
Even without weapons the At-Rt is a big cylinder of light cover (heavy with low profile or suppression) that can be placed where you need it. 3 naked At-Rt’s only cost 165p and that is 18hp with armor walking towards your opponent. I haven’t played with weaponless At-Rt’s, but I am tempted to do a melee rush list with them, if you want to see battle reports with that kind of army please consider supporting me on patreon.

Displacement 
When you are moving into melee with a trooper unit that has 2 or more models, you can often manager to displace one model, while moving into base contact with another. That way you give the unit 1 suppression from displacement as well as attacking them. You can also do a little dirty move when displacing your own units, that way you can displace your own unit leader in order to move then further ahead. Sure they get 1 suppression, but if it’s late in the round it will just go away in the end phase.

At-Rt’s place today
With the newest addition of tauntaun riders, the rebels have access to 3 different support units. I find that At-Rt’s work best with Han Solo or the generic officer. Leia and Luke works best with troopers due to their abilities and command cards, not that you can’t take At-Rt’s with them just that they prefer trooper focused armies. Jyn works well with most things that can take care of themselves if you use inflitrate. The tauntaun riders have better mobility and strike hard vs troopers with red dice save or better. The laser turret gives great firepower at range 4 for cheap, but the lack of mobility can be exploited by your opponent. Both are great options, but the At-Rt’s strenght is the advantage of armor and no courage as well as flexible weapon options.

List idea: Vehicle heavy. This is a list that I think can go against the new meta of more and more trooper units and less vehicles and impact. This army can march up the board and throw out dice. Rotary blaster works against most targets and the landspeeder is kited for anti-tank.

Rebell alliance

  • Rebel officer
  • Esteemed leader
  • 55p
  • Rebel officer
  • Esteemed leader
  • 55p
  • Rebel troopers
  • Z-6 trooper
  • Astromech
  • 70p
  • Rebel troopers
  • Z-6 trooper
  • Astromech
  • 70p
  • Rebel troopers
  • Z-6 trooper
  • 62p
  • Rebel troopers
  • Z-6 trooper
  • Comms specialist
  • Comms relay
  • 76p
  • At-Rt
  • Rotary blaster
  • 85p
  • At-Rt
  • Rotary blaster
  • 85p
  • At-Rt
  • Rotary blaster
  • 85p
  • X-34 landspeeder
  • M-40 ion blaster
  • Ryder Azadi
  • Rps-6 rocket gunner
  • 154p

Total: 797p

This is my analysis of the At-Rt. A fine unit that still holds up. If you are curious about the Landspeeder pls let me know in the comments, I would love to do an analysis of that unit. If you like my stuff, please consider supporting med on patreon: https://www.patreon.com/Rebelsguide

Rebels!
terrain

Downed At-st step by step

When I started working on the at-st I didn’t plan on doing a step by step, but it just kinda happened.

Step 1 preparation. When I opened it I noticed the base was very uneven so I had to put it into hot water in order to bend it flat. I then started with a brown primer.

While the scenario included talks about a recently crashed at-st, I felt that the model screamed old overgrown wreck. I planned on working from the ground up with rust.

Step 2 rust. I painted on a very watered down dark brown to the at-st parts. Followed by splatter on some heavy watered down orange on pieces I though could be rusty (picture mixing)

Step 3 at-st armor. Time to start with the grey parts of the vehicle. I drybrush with a dark grey. The reason I drybrush is because I want to keep the rust I worked on in step 2.

I’m doing 3 coats until I’m satisfied with the coverage.

Step 4 wash. Time for a wash, I used gw agrax earthshade, but any brown wash will do. I’m using brown wash to give a more wheatered look.

Step 5. Time to start lighting up the grey, starting with the grey I used before, but with a little bit of white.

I then go with 2 more steps of drybrushing while adding more white each time.

Feeling it lacked depth, I used very watered down black paint on the blast holes, battle damage and vents.

A few last touches using white with a little grey on a few edges as a final highlight.

At-st part done.

Part 2 the base

Step 1 Dirt. I started by painting all the sand parts with a dark brown, in this case I use gw rhinox hide wich is what I use for base color in my rebel army. Then I painted all the rocks black.

Step 2 sand highlight. I drybrush all the sand with a lighter brown.

Step 3 Rocks. I drybrush all the rocks with a dark grey followed by more coats adding more white as I go until I’m happy with the results.

At-st and base painted and done. I give the model a matt varnish spray then it’s time for flocking.

Part 3 Flocking.

Step 1. I use a mix of pva glue and water (70/30) that I brush on in patches before putting on some flock grass then turning the model over and give some light taps to lose the non stuck grass.

I do this in patches because I find it easier and it dosen’t get as messy with grass every where.

Step 2 extra touches. I then add some grass tufts and lycen so it fits the rest of my rebel and terrain bases. I also added a few patches of bush that I had left over from making trees at a few places on the wreck to make it look a bit overgrown. (Pic missing).

The downed At-st is all done.

This was a fun model to work on and despite it being a bit uneven out of the box it was pretty easy to fix with hot water. The price tag is a bit high, but I look forward to playing the scenario some day soon.

Did you like this step guide?, Do you want to see more like it? Then let me know in the comments and consider supporting me on patreon:

https://www.patreon.com/Rebelsguide

terrain

Imperial landing pad finished

Time to finish up the landing pad. I painted the fence and lightpoles. Then I wanted to replicate the yellow rings on the landing pad from return of the jedi. I also added some scratches, battledamage to make it look used and worn.

I used my bandai tie fighter to test the pad. I think it looks alright despite the scale. I also got a revell imperial shuttle, but I don’t have access to it atm.

I have started a patreon if you would like to support my future terrain projects. https://www.patreon.com/Rebelsguide

terrain

Imperial landing pad

I have a revell imperial shuttle as well as a huge Millenium falcon model. The scale is a bit small, but with a landing pad it would look pretty good. I would love a big 3d printer, but until then I prefer to make stuff out of cheap material.

I was pretty happy with the end result. Some foam board, wood sticks, cardboard and toilet rolls.

Next is priming and painting

I feel like I get some decent results with a brush, but for this kind of big terrain I wished I had a airbrush.

Next time I will do the details and some markings. Hopefully it will turn out okey.

Special forces, Unit Analysis

Rebel Commandos unit analysis

Rebel commandos analysis

General Solo?, is your strike team assembled?

Rebel commandos is probably the expansion for the rebels with the most value since you can field 2 units out of the box and you get 7 very nice minis. This was the first rebel special forces and they are essentially rebel troopers on steroids, the strike teams are on the other hand just like the name entails, a small unit that strikes critical targets. 

Rebel commandos (unit)

Like I said commandos are rebel troopers on steroids. They come in at 60 points for the base unit of four models so 15 points per model compared to the 10 point trooper. They keep the same defence die and weapon, but they have a lot of nice keywords to make Them stand out. Like fleet troopers and rebel veterans they got surge-hit and sharpshooter 1 on top of that. In defence they got low profile which is great thanks to their courage value of 2, that allows them to get heavy cover from suppression while requiring 2 to lose their action after rally.

Unit options and abilities

Commandos have access to 2 different heavy weapons, but no personel upgrade. In top of that they got access to gear, comms and training. They have several abilities: 

Low profile which gives them heavy cover if they got light, this is a nice ability to have since some terrain should be light and they can get heavy from hiding behind at-rt’s or emplacement troopers or just out in the open of they have suppression.

Scout 2 that allows them to make a speed 2 move when deploying, nothing gamebreaking, but depending on terrain, deployment and objective cards this is an ability that shouldn’t be overlooked since they can get a great position outside deployment or move into claim position for objectives.

Sharpshooter 1 this is great since most shots vs other infantry will be at least light cover, it’s almost like adding an extra hit to their attack rolls.

put me and this here sniper rifle anywhere up to and including one mile of Emperor Palpatine with a clear line of sight, sir… pack your bags, fellas, war’s over

They got 2 heavy weapons to choose from, one being the DH-447 sniper rifle. This weapon is special since it got range 1 – infinite, making it a great weapon for splitfire since it can always reach a target. It adds 1 white dice over the standard rifle which isn’t too exciting, but it has pierce 1 and high velocity which don’t allow dodge tokens to be used…providing it’s the only weapon in the attack. So just to compare with a Z-6 trooper squad which is in my opinion the gold standard.

Average hits 

  • Z-6 troopers: 3.5
  • Commandos sniper: 3.5

So at first light it’s the same, but adding the pierce and sharpshooter on a standard stormtrooper squad in heavy cover we get:

Average wounds

  • Z-6 troopers: 0.75
  • Commandos sniper: 1.875

More than twice amount of dead bucketheads!

“What is an aimbot?”

This is in a control environment of course, but my point is don’t let the amount of dice fool you. Against lighter armor the commandos advantage decreases and increases vs heavy armored  targets like death troopers. A commando squad with a sniper gives you a quality attack that excels vs imperial targets. The downside is that your commandos die just as easy as normal troopers when fired upon, while low profile helps a bit of course.

“I’m just gonna drop this here”

The second weapon option is the proton charge saboteur which is a different kind of weapon option than other units have. It does not add any dice or keywords to the attack pool, instead it’s an area weapon that needs to be charged then detonated. So unlike exhaust weapons you don’t have to recover it, but you have to spend an action to arm a charge within 1 of the unit leader. After a charged is placed any friendly unit with “detonate proton charge” can detonate it after any unit have performed an action. When detonated the charge performs an attack vs every unit att range 1 of the token and line of sight including friendly units. The proton charge model uses the commandos ranged weapon of 1 black die, but the real advantage comes when using the charges since you get to attack every unit in range and los. I will speak more about proton charges, their effect and how to use them in a future analysis. You can have a maximum of 3 proton charge saboteurs in your list and that’s a potential 18 charges armed (3 saboteurs x 6 rounds), more likely it’s 8-12 and you need at least one unit left with detonate proton charge to use any placed charges. So a commando unit with a proton charge saboteur can be a base unit combined with 2 strike teams with saboteurs.

Upgrades

Commandos can have a plethora of different upgrades. Grenades, gear, comms and training.

Charge beats grenade!

I don’t usually take grenades on commandos. Frag grenades is a decent dmg increase, but restricted att range 1 for a unit that prefer attacks at range. Frag grenades seems overkill when you already have sharpshooter 1 and if you want anti tank then the proton charge is a better use than impact grenades.

There is a lot of gear that’s useful. Recon Intel to get a scout move of 3 is perhaps not necessary, but fun and can give you a nice alpha strike with scout move-move-shoot or scout move-shoot-move back depending on deployment. Environmental gear is a solid choice as your commandos can turn difficult light cover terrain into free heavy cover terrain and it helps your scout move. Emergency stims is just as good here as on other expensive units. Grappling hooks is also a great thing with scout, as you can scout move into a climbable terrain piece then during your activation you can climber-shoot. Targeting scopes is usually a never take for rebels, but combined with the hunter training card it’s actually a valid choice.

Comms is not as pick and choose friendly. Comms jammer doesn’t suit commandos as they prefer long to mid range. Comms relay can be used with sabotage communications to great an upgrades ambush card. Hq uplink is the one I use the mosh, just to get the extra uses from Luke and Leia’s 2 pip cards and to ensure control of when I can activate my commandos and I prefer this over long range comlink.

Comms Combo!

Training is a powerful category, but pretty specific in it’s cards. Tenacity is just a no take since single wound units can’t be wounded. Duck and cover is a good one as it combines with low profile, however it is expensive and in the wake of death troopers, Palpatine and Bossk the empire have a fair number of suppressive weapons. This can make duck and cover as risk as you can easy help your opponent to suppress or even panic your commandos. Endurance is good, but not really necessary unless you run into a lot of the aforementioned suppressive weapons on a regular basis. My favourite is the hunter card. It’s not to expensive at 6 points and it suite the commandos offensive capabilities perfect.

Free aims?, yes please

Builds and tactics

The classic commandos

  • Rebel commandos 60p
  • Sniper 26p
  • Environmental gear or grappling hooks 3p
  • Hunter 6p
  • Hq uplink 10p

total 105p

These guys are the standard commando squad I play. You can cut some fat by skipping the hq uplink, but I like the command flexibility. These are the rebel hunters and what do they hunt you ask? These guys are character killers. Any commander, even Palp or Darth with the immune pierce are prime targets. Commanders usually hang around with royal guards which is a free aim token piñata. They prefer to stay at mid range where they can bring all their guns to bare and their focus is to take down enemy commanders, operatives and royal guards. A trick is to splitfire the weapons between a commander and his guard to get 2 aim tokens if both are wounded. The sniper can be shot at a commander to ignore dodge and pierce can be used on a guardian hit if the target have immune pierce. The other guys throw their dice at the guards something different, with sharpshooter negating some of the cover tax of attacking multiple units.

This unit like a lot of rebel units prefers Leia as a commander. Her command cards works well, 1 pip can drop wounds on units for hunter to trigger, the 2 pip is just good and the 3 pip let’s Leia inspire and order take cover on them before they activate. Using Leia with strict orders you get very good control of suppression, you can make sure to keep one token for low profile if necessary. Commandos love at-rt supports as they can walk behind them and gain heavy cover while either shooting in base contact or through them with sharpshooter.

“Heavy hitting diplomacy”

List example:

++  Standard (Rebel Alliance) [796 Points] ++

+ Commander +

•Leia Organa [100 Points]: Strict Orders, Esteemed Leader

+ Operative +

•Chewbacca [122 Points]: Emergency Stims, Tenacity

+ Corps +

Fleet Troopers [78 Points]: Fleet Trooper, Scatter Gun Trooper

Rebel Troopers [62 Points]: Z-6 Trooper

Rebel Troopers [62 Points]: Z-6 Trooper

Rebel Troopers [62 Points]: Z-6 Trooper

Rebel Troopers [62 Points]: Z-6 Trooper

Rebel Troopers [58 Points]: 2-1B Medical Droid

+ Special Forces +

Rebel Commandos [107 Points]: DH-447 Sniper, Environmental Gear, HQ Uplink, Hunter

+ Support +

Rebel At-Rt [85 Points]: Rotary Blaster

+ Command Hand +

Command Hand: •Coordinated Bombardment, •Sabotaged Communications, ••Brains and Brawn, ••No Time for Sorrows, •••Covering Fire, •••Somebody Has to Save Our Skins, ••••Standing Orders

++ Total: [798 Points] ++

Created with BattleScribe (https://battlescribe.net)

The proton base

  • Rebel commandos 60p
  • Proton charge saboteur 24p
  • Duck and cover 8p
  • Comms relay 5p

Total 98p

This is another commando unit I’ve used when playing a triple proton charge saboteur lists. It’s Main purpose is to survive and detonate charges and place some on a backline objective. They can take descent potshots and the comms relay is for the sabotaged communications command card or just to boost command range to runaway strike teams. I like to play a Han&Chewie saboteur list. Han Solo’s reckless diversion help to stop fire on your strike teams and “sorry about the mess” combined with improvised orders help to guarantee a last first activation. Chewie works well with Han and His guardian helps keeping your strike teams alive. 

What I see when I play reckless diversion

List example: 

++  Standard (Rebel Alliance) [799 Points] ++

+ Commander +

•Han Solo [130 Points]: Improvised Orders

+ Operative +

•Chewbacca [122 Points]: Emergency Stims, Tenacity

+ Corps +

Rebel Troopers [62 Points]: Z-6 Trooper

Rebel Troopers [62 Points]: Z-6 Trooper

Rebel Troopers [62 Points]: Z-6 Trooper

Rebel Troopers [62 Points]: Z-6 Trooper

Rebel Troopers [62 Points]: Z-6 Trooper

Rebel Troopers [58 Points]: 2-1B Medical Droid

+ Special Forces +

Rebel Commandos [91 Points]: Comms Relay, Proton Charge Saboteur

Rebel Commandos – Strike Team [44 Points]: Proton Charge Saboteur, Recon Intel

Rebel Commandos – Strike Team [44 Points]: Proton Charge Saboteur, Recon Intel

+ Command Hand +

Command Hand: •Sorry about the mess, •Sabotaged Communications, ••Push, ••Reckless Diversion, •••Change of Plans, •••Notorious Scoundrels, ••••Standing Orders

++ Total: [799 Points] ++

Created with BattleScribe (https://battlescribe.net)

Final thoughts

Give me votes!

In conclusion I think the Rebel Commandos are a valueable unit in the rebel alliance and much needed to counter the royal guard based death balls, either with hard shooting or the area damage of the proton charge.

This was my thoughts on the Rebel Commandos who are in my opinion an unit that get’s overshadowed by their strike team brothers and sisters. Speaking of wich, I might talk about them next time or perhaps I will give my thoughts on the At-Rt, make your voice heard in the comments!

terrain

Forest/jungle pools finished

I mixed togheter some paint from blue, green and brown doing som pretty crude layer work.

This is because I want this to be seen under the pva glue. I put alot of glue, but careful to avoid it going over any edges. I let them dry with a covering box to avoid 1 billion cat hairs that is covering everything else in our apartment.

The two small pools ended up great. Sadly the big one rose in the middle pushing the glue to the sides and spillning some over sadly. The drying time also exceded my expectation. I was thinking about 24h, but it was more around 72h.

My last steps was to add some grass on the base as well as some tufts in the water. I used my hot gluegun to make some nicer borders and make the tufts look half submerged. I also made some bubbles with the gluegun. I might go all gluegun next time. Then I added 2 layers of gloss varnish on the water.

The end result for the small ones is great, but the large one didn’t get the same nice effect. I think for future water terrain, I will avoid large circles and make them a bit more random in shape.

terrain

Terrain wip forest/jungle pools

A terrain piece I got inspired to make after a game at “Spelens hus” in Sweden. They hade large pools of water we used in our game. I think we need more terrain like this that is just negative and offers no cover, but slowing down troops. Otherwhise you just get 2 armies of troopers sitting in heavy cover taking potshots at eachother.

I also recently purchased clear pva glue so I really wanted to give water terrain a go.

I cut out one large circle board and 2 smaller ones out of thin mdf. I then grinded down the middle of them. Later i used spacklet and decorative rocks to build up the sides so I lager could get some real depth to the water.

I added a stick and some rocks to the big one for a little fair, then based the pieces with sand/pva/water mix as usual then primed it brown. I then started the painting process with a sea green. I plan to get some crude layering done so it will look like the water goes from shallow to depth, even after i put on the pva.

Join med next time when we finished these pools.